11 Brilliant Halloween Makeup Ideas You Can Recreate at Home

When it comes to Halloween makeup, there are two moods: all-out spooky extravagance or clever simplicity that gets the job done with minimal effort.
Whether you’re the type who’s been meticulously planning your costume since November 1st last year, or you’re just realizing that Halloween is next week, there’s no need to panic. Not every look requires a full-body transformation or a closet full of supplies—sometimes, all you need is a bit of makeup and a dash of creativity to own the night.
From super simple scratches you can whip up with a fork (yes, really) to a haunting stitched mouth that’s creepily cute, we’ve rounded up 11 killer looks that will have you Halloween-ready in no time. No frenzied trips to the store or hours in front of the mirror are required—just grab some eyeliner, lipstick, and maybe a toothpick, and let’s get spooky.
1. Aluminum Foil Hack
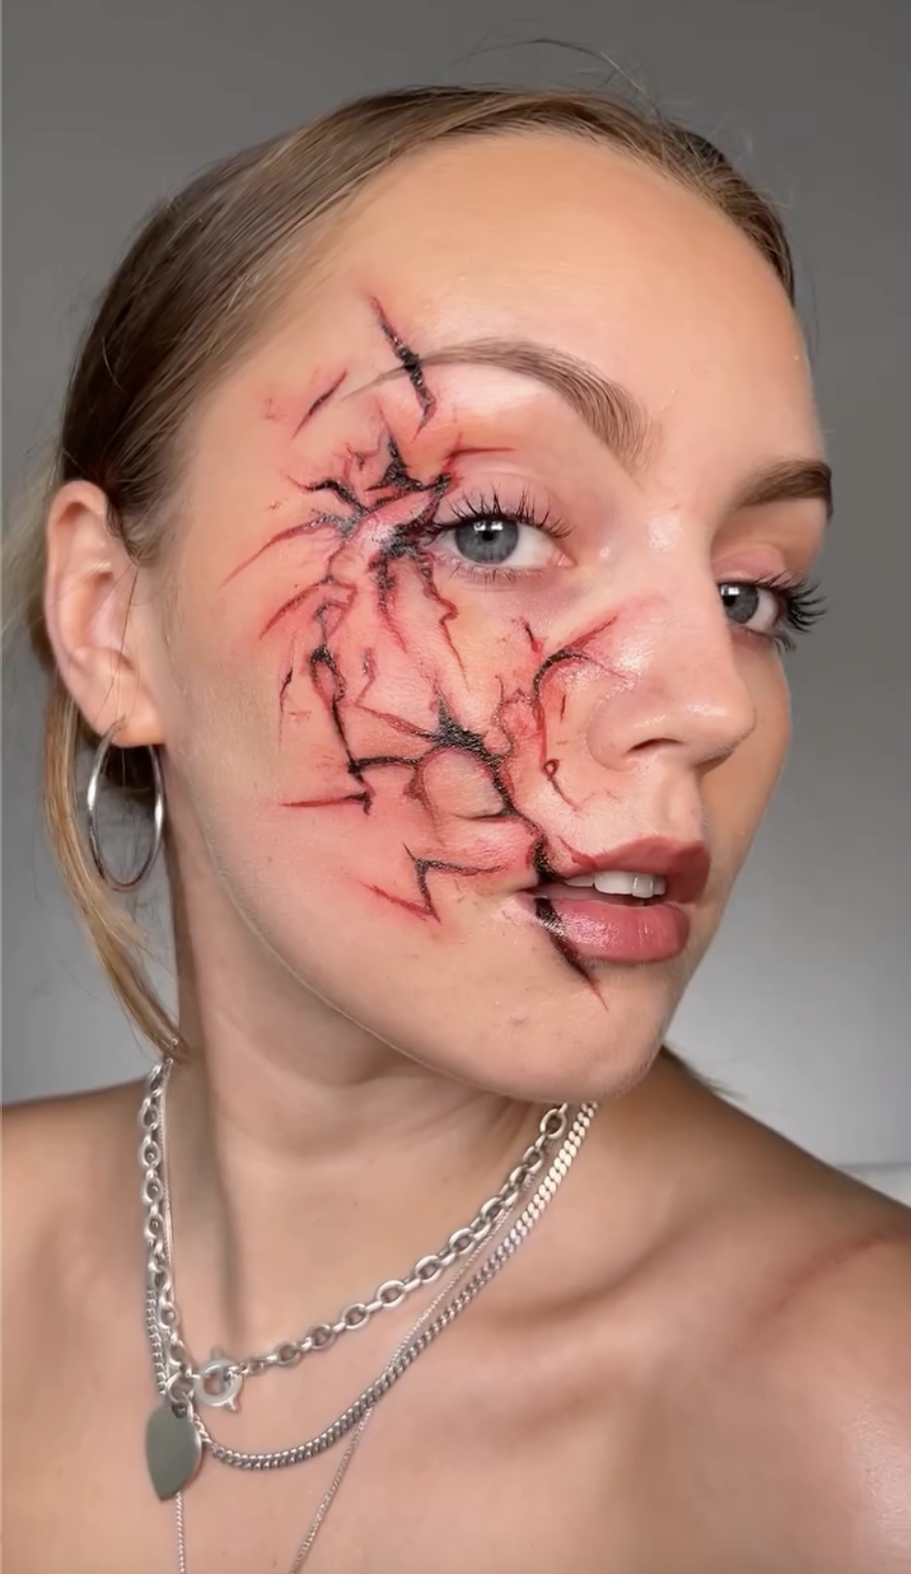
Steps for this Halloween makeup look:

This one is so easy to recreate and doesn’t need a lot of practice if you’re looking for last-minute Halloween makeup ideas that are dead easy to recreate.
Make sure your face is clean and prepped with your usual base makeup. You want your skin to be a smooth canvas for this cracked effect.
Grab a piece of aluminum foil and crumple it up lightly. This is going to be your stamping tool to create those organic, cracked lines on your face. Now, brush some red face paint onto the crumpled foil. You don’t need it too neat—just make sure there’s enough product to transfer when you stamp it onto your skin.
Carefully press the painted foil onto the area of your face where you want the cracked look. Hold for a moment, then pull it away to reveal those jagged red lines. It’s already starting to look spooky!
Next, take a red eyeliner pen and drag out some of the stamped lines. This step gives a more pronounced and intense look. You don’t need to follow the exact pattern—just go over the lines that you want to pop a bit more.
Grab a medium-sized eyeshadow brush and dip it into a red eyeshadow. Lightly blend over the cracks you’ve created, focusing on the outer edges to give more dimension. This will add depth and make it look more realistic and less flat.
Now, take a black eyeliner pen and trace along some of the red cracks for a bit more intensity and contrast. Feel free to add the black only in certain areas—you don’t want to overdo it! If needed, go back with your red eyeshadow and lightly go over the black lines. This will soften any harshness and blend everything together.
2. Beetlejuice Lips

Start with clean, moisturized lips. You want a smooth base for the face paint or lipstick to glide on effortlessly.
Using a pigmented white face paint or liquid lipstick, line and fill in your entire lips. Make sure the color is opaque, so it really pops. A small lip brush can help with precision here.
Now pout your lips tightly, creating natural folds. Then, gently dab black liquid lipstick onto the center of your lips, letting it catch in the creases. Be careful not to apply too much.
Once you’ve applied the black lipstick, let it dry for a couple of minutes. Don’t move your lips just yet—you want those stripes to stay sharp. After the black has dried, relax your lips. The pouting technique creates the striped black-and-white Beetlejuice look.
What we love about this Halloween makeup idea is that you can switch up the colors for a different vibe. Dark purple and light pink, or green and orange, can also give you a cool, spooky effect.
3. Safety-Pin-Sewn Mouth
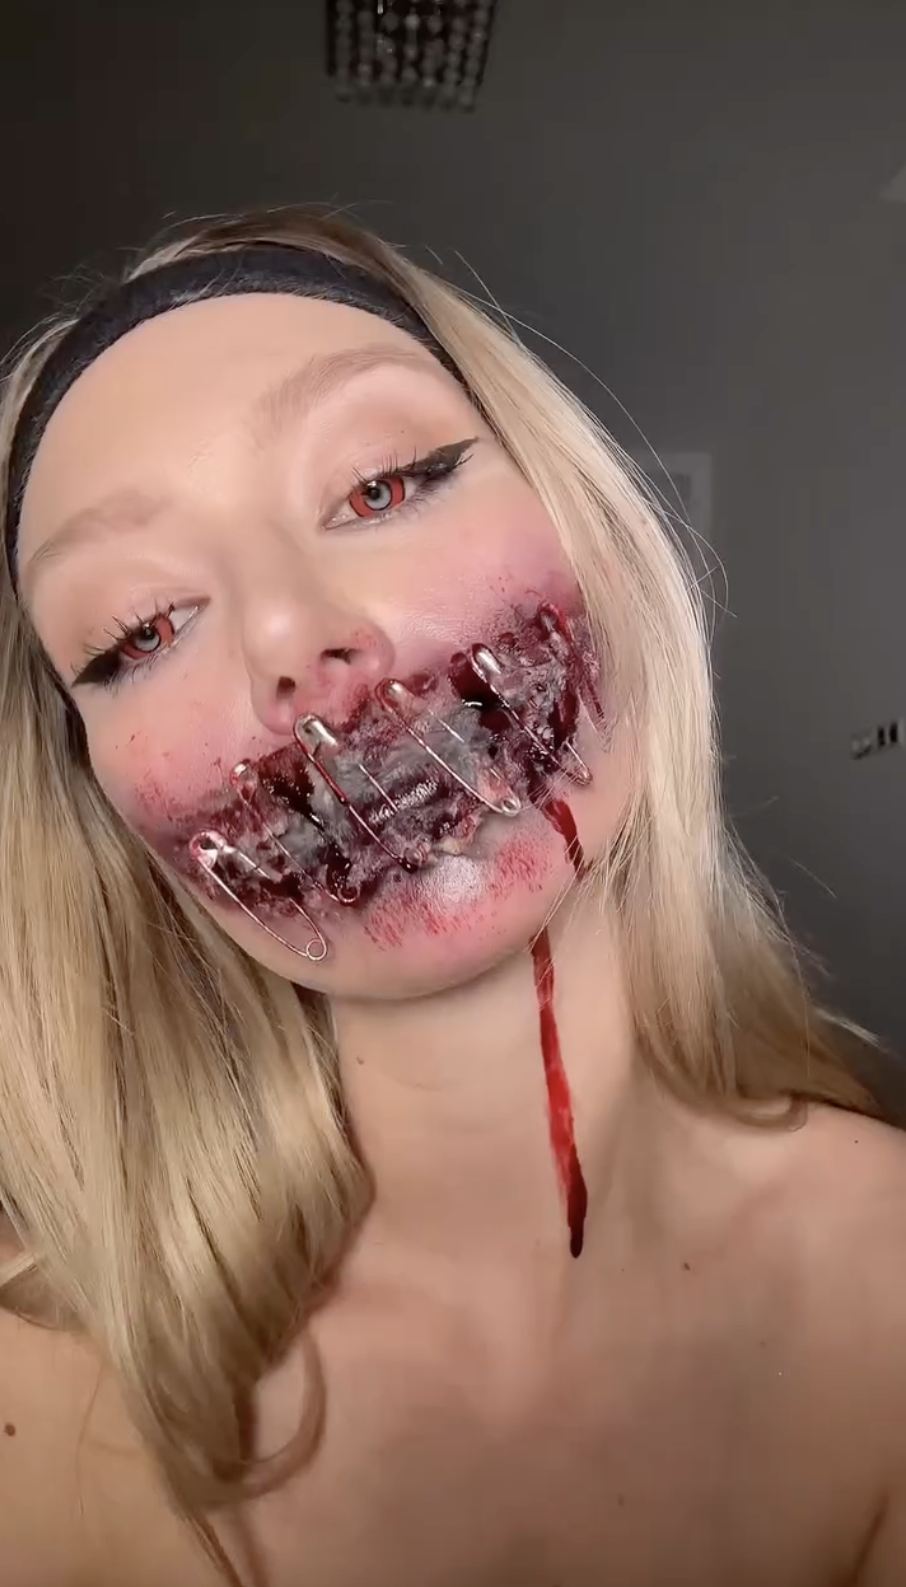
Steps for this Halloween makeup look:

This look is creepy, detailed, and perfect for Halloween, guaranteed to make an impression at any party! First thing you’ll need to do is sketch out the shape of the larger, exaggerated mouth you’re going for around your natural lips with a brown lip liner.
Using eyelash glue, carefully trace over the outline you just created. This will act as the adhesive for the cotton. Split your cotton makeup removing pads in half and tear them into smaller pieces.
Start placing these pieces along the glue, pressing them firmly but gently so they stick. Work quickly before the glue dries. With small eyebrow scissors, carefully make tiny cuts along the cotton at the corners of your mouth to create a torn effect.
Now apply a generous amount of liquid foundation over the cotton to blend it with your skin tone. You want it to look as seamless as possible.
Use liquid lipstick (preferably a deep color like black or dark red) and apply it not only on your lips but also slightly beyond, extending the shape to make the mouth appear larger.
Now, grab a purple or maroon eyeshadow and blend it around the outer edges of the cotton to give the illusion of bruising and depth. Follow up with a dark brown eyeshadow closer to the cotton edges to further intensify the look.
Take 5-6 safety pins and carefully insert them into the cotton along the top and bottom “lips” of your newly created mouth. This gives the stitched-together illusion.
To finish the look, apply fake blood liberally over the cotton and around the safety pins, letting some blood drip down your chin and neck for extra dramatic effect.
4. Jaw-Dropped (Literally)
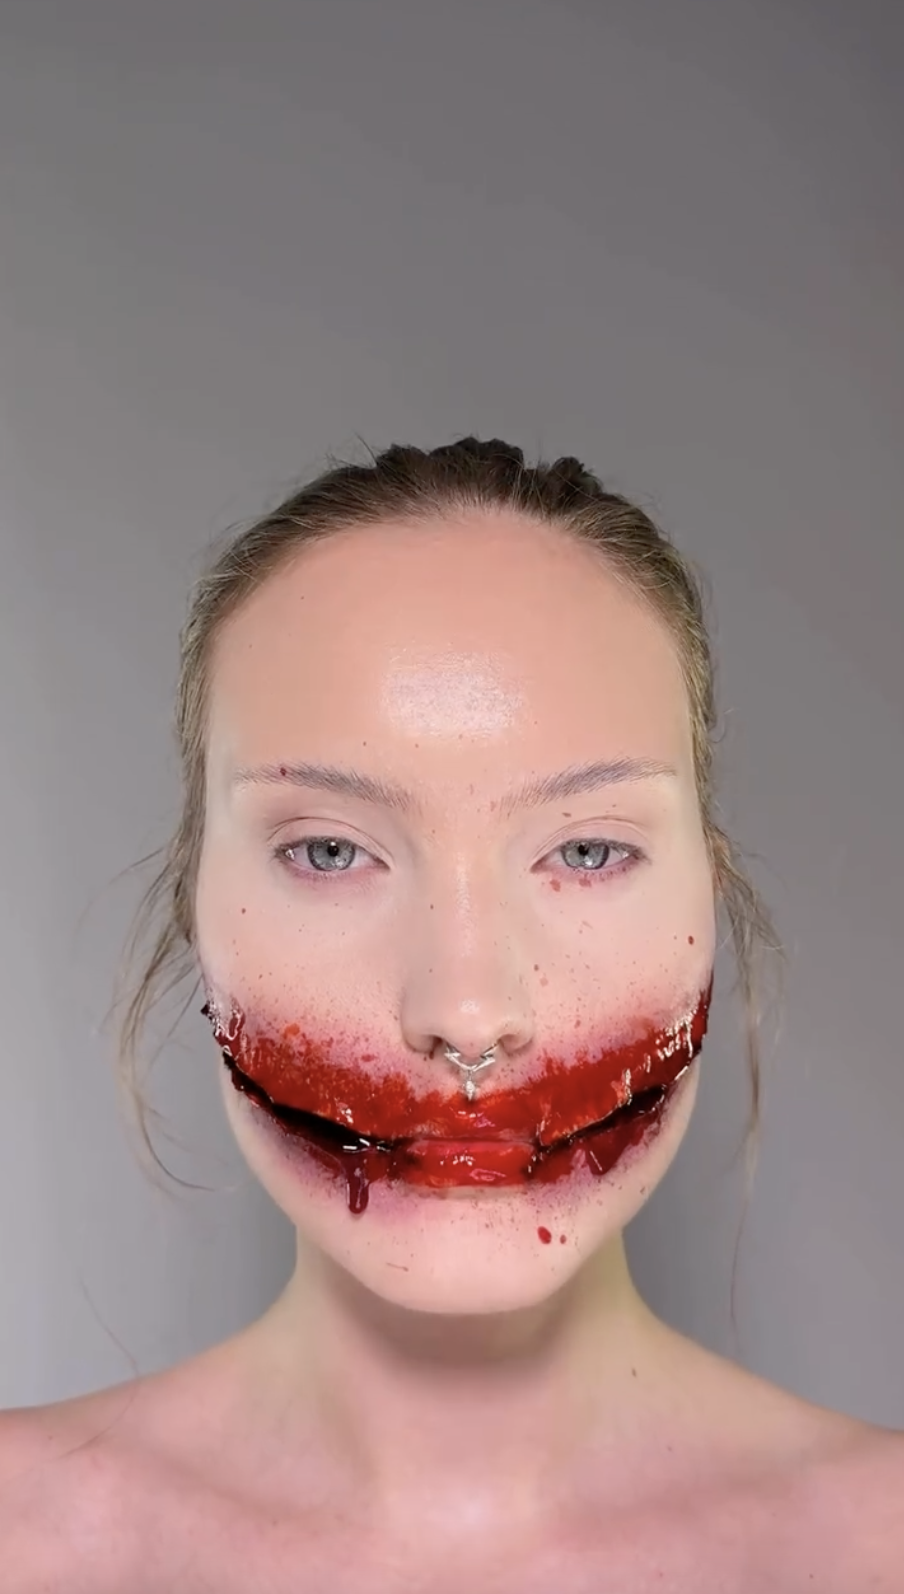
Steps for this Halloween makeup look:

This ripped mouth SFX look is not for the faint of heart, but it’s surprisingly easy to pull off with just a few tools. Think bloody, sinister, and downright terrifying—here’s how to recreate it!
Apply a layer of foundation on your face as the base for the look. Use a beauty blender to ensure smooth application, giving you an even canvas for the work.
Cut out four pieces of paper towel into thin, curved triangles to extend the mouth on each side. Stick these to your face using lash glue, one piece at a time, layering them to create a sturdy base. pply more lash glue on top of the paper towels to make them more rigid and sturdy. Once dry, cover the towels with a lighter foundation to blend them with your skin using a beauty blender.
Begin shading the area around the paper towel with brown eyeshadow, focusing on the edges. Layer darker purple eyeshadow on top to create depth and give the ripped mouth effect more dimension.

Carefully use eyebrow scissors to cut through the paper towels, starting from the inner corners of your mouth and curving upwards to create a “smiling” effect. Make sure the incision goes through the fake paper towel mouth, showing the skin underneath.
Using black face paint and an angled brush, line the inside of the cut you made, giving the mouth more definition and making it appear deeper and more hollow.
Now apply a bright red lipstick to your real lips and slightly extend the color over the edges of the fake mouth to blend the real and fake mouth together.
Dip a toothbrush into fake blood, then use your finger to flick the blood around the mouth, adding splatter and drips for a gruesome, bloody effect.
5. Cracked Doll Face
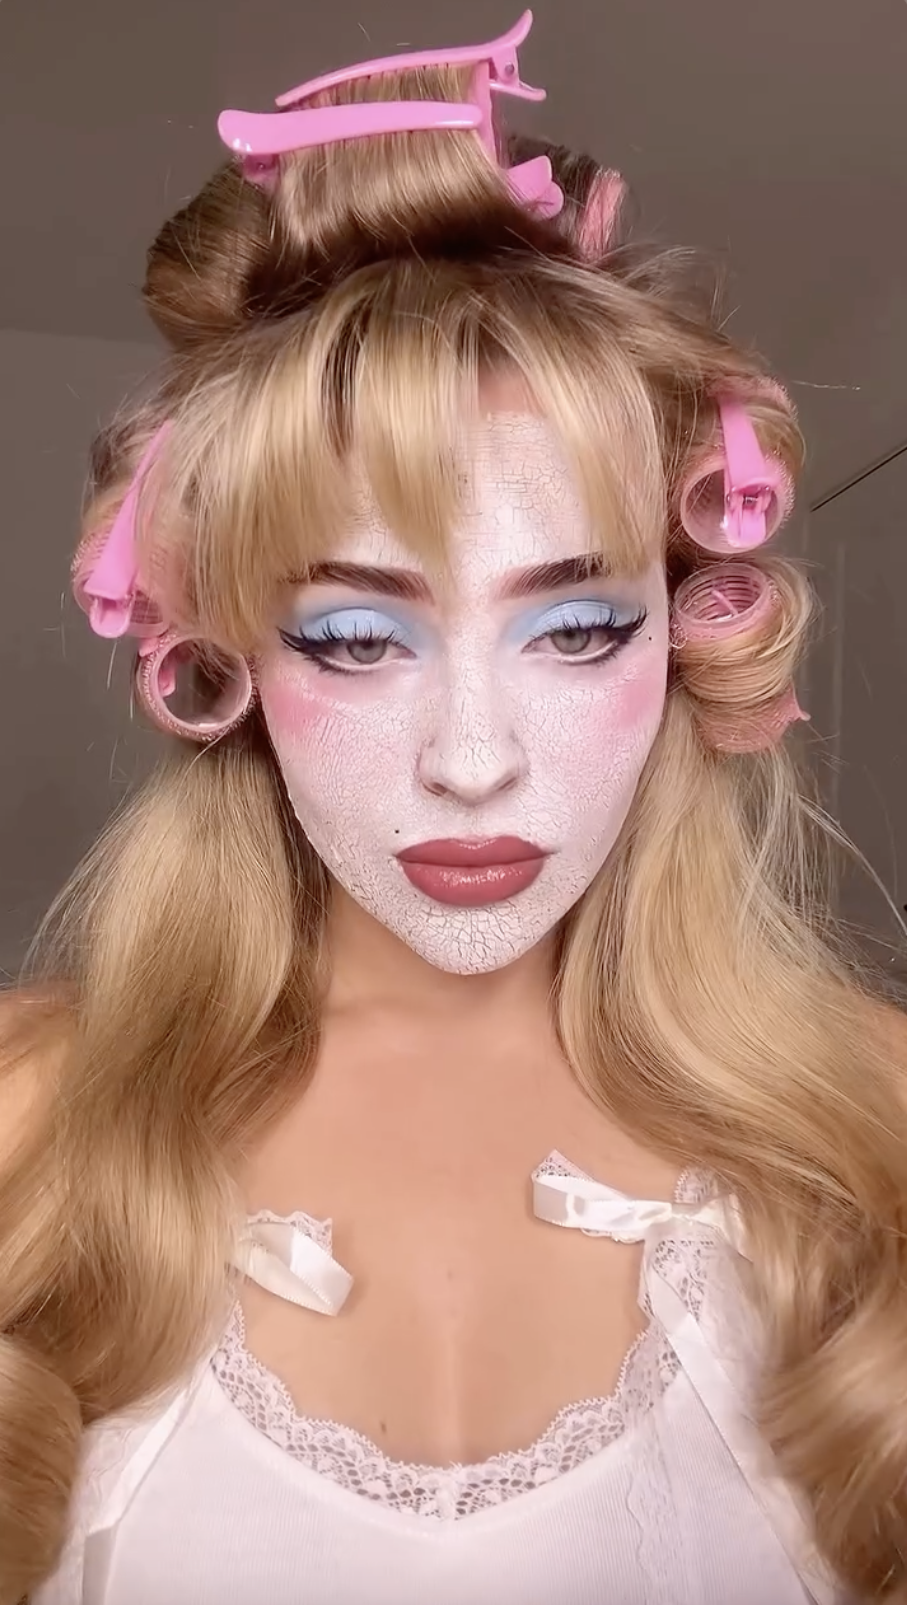
Steps for this Halloween makeup look:

Transform into a broken yet beautiful porcelain doll with this cracked doll face Halloween makeup. It’s the perfect balance of eerie and elegant—just in time for Halloween!
Start by mixing a white clay mask with a bit of water to create a thin, smooth paste. Using a foundation brush, apply an even layer of the clay mixture all over your face, making sure to cover every corner. Now wait for the mask to dry completely before moving on to the next step.
Once the mask is dry, start moving your facial muscles—raise your eyebrows, move your mouth, and flex your jaw. This will naturally crack the mask in various places, creating that porcelain doll effect.
Now apply white eyeshadow over your eyelids to blend them with the cracked paint. Follow with a soft blue eyeshadow to blend over the lids for that soft, doll-like effect. Add a hint of silver shimmer to the center of the eyelids and on the brow bone to give a glowing, wide-eyed appearance. Finisht he eyes with a winged eyeliner, adding definition to the eyes and exaggerating the doll-like shape.
Now for the blush! Use a bright pink blush and apply it generously on the apples of your cheeks to give that signature doll-like rosy look.
Line your lips with a nude liner to maintain the softness of the look. Finish off with nude lipstick, followed by a clear gloss to add a plump, shiny doll lip effect.
Once the makeup is set, take a moment to adjust any cracks, adding a bit more character with some subtle movements. If you want, you can draw additional ‘cracks’ using black eyeliner to create deeper fractures on your face.
6. Spider Web Eyes
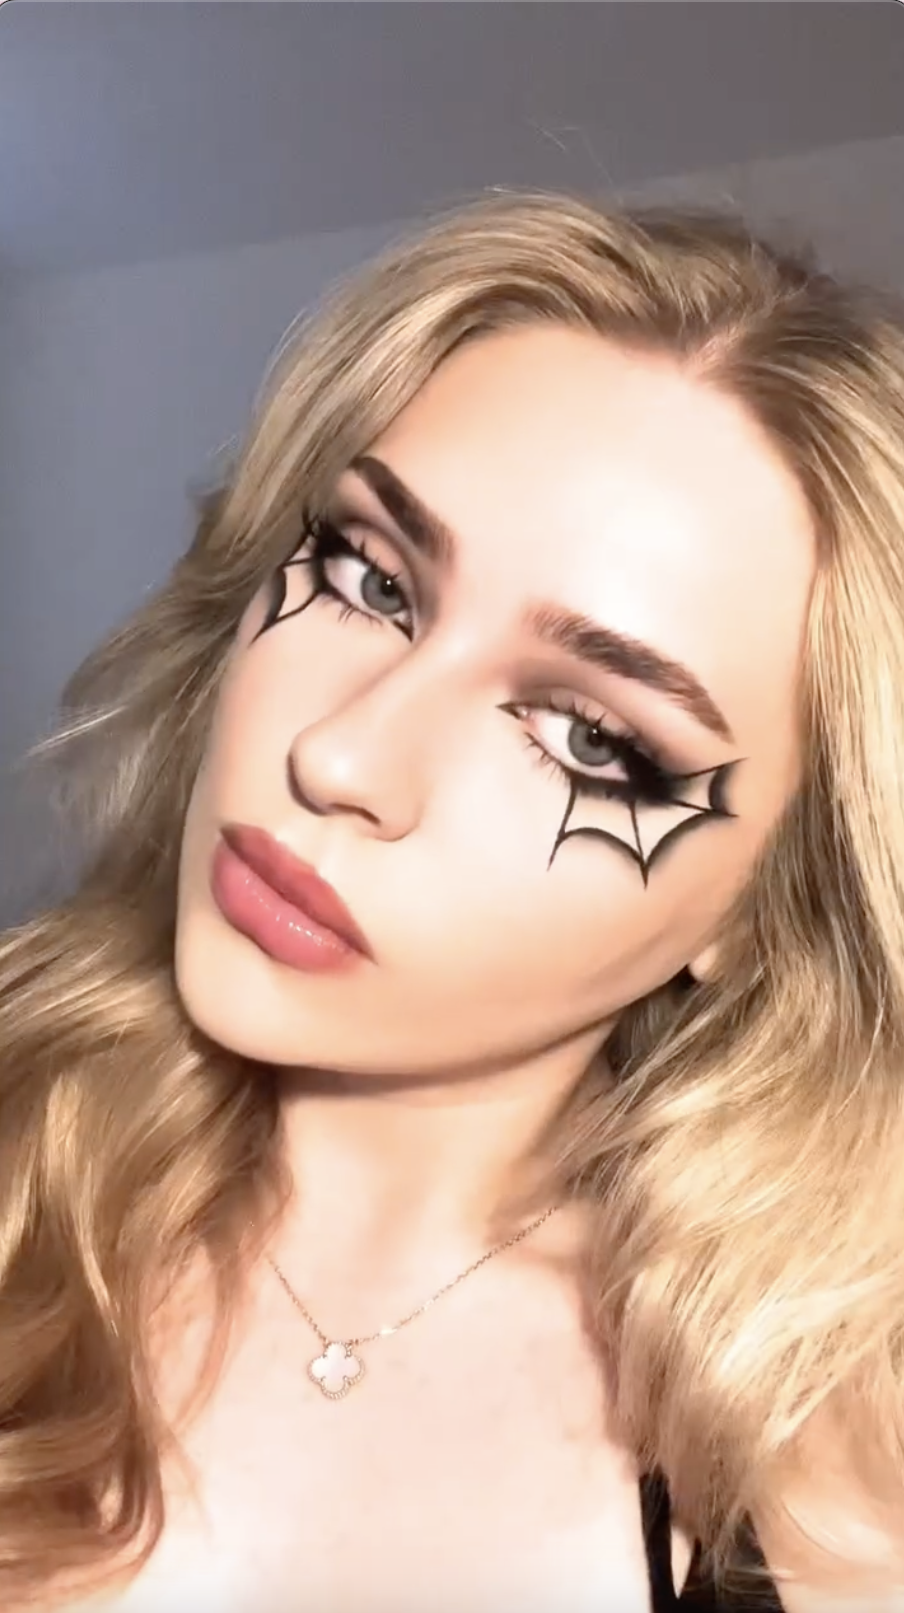
Steps for this Halloween makeup look:

Start by taking a small rectangular piece of cardboard and dip its edge into loose translucent powder. Stamp the powder around your eyes, creating straight lines for the basic spider web shape. Connect the top line to the outer corner of your eye, where you would usually draw the wing of your eyeliner.
Next, use the curved end of your eyelash curler to connect the stamped lines, to give your web that signature curved effect. Now that your spider web outline is in place go over it with a black gel eyeliner pen for sharp, defined lines. This really brings the web to life.
With a small eyeshadow brush, apply black eyeshadow along the outer corners of your eyes under your lashes. Lightly smoke out the edges to add depth and a sultry vibe to the look.
Using the same brush and black eyeshadow, softly blend the outer edges of the spiderweb. This step gives the web a shadowy, 3D effect, making it more dramatic.
Complete the look by drawing a winged eyeliner that connects to the starting point of the spiderweb. This ties the whole eye look together with an edgy flair.
7. The Joker Look
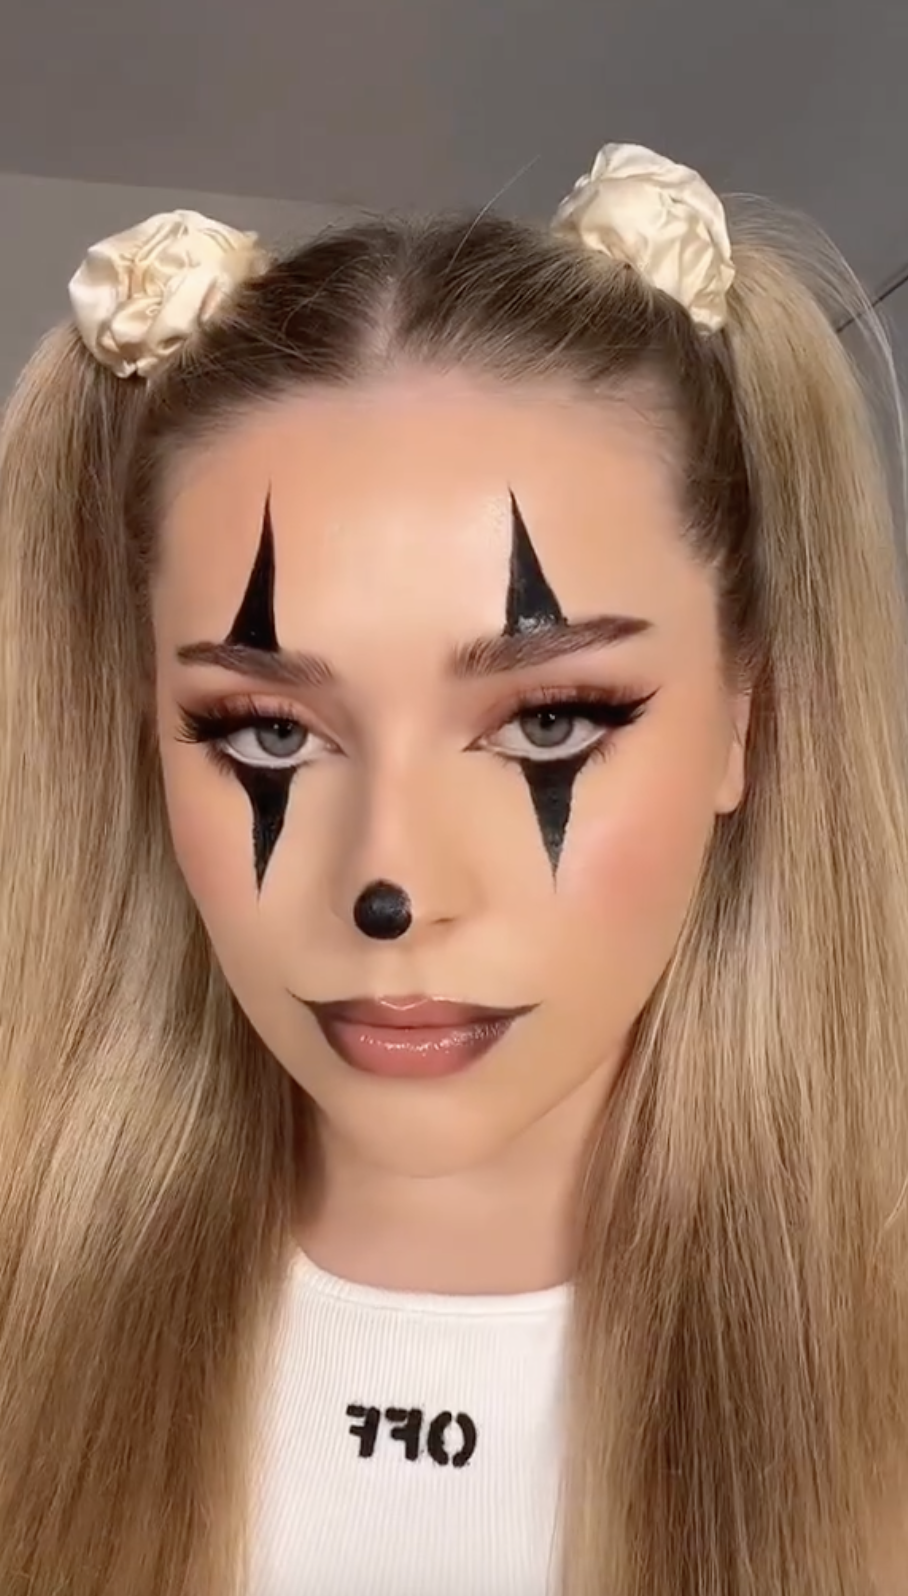
Steps for this Halloween makeup look:

Start by taking a small rectangular piece of cardboard. Line one of its edges with a black liquid eyeliner. You’ll use this to stamp the triangular shapes above and below your eyes.
First, press the lined cardboard edge above your eyebrow to create an upright triangle that connects to the brow. Then, do the same below the eye, aligning the stamp to form an inverted triangle connected to the middle of your lower lash line.
Use a small circular object, like the cap of a lip liner or something with a similar diameter to the tip of your nose. Line the inner edge of the cap with your black eyeliner, then gently stamp the tip of your nose to create a perfect circle outline.
Now, using the same black liquid eyeliner, fill in the triangles above and below your eyes. Carefully fill in the circle on the tip of your nose as well, ensuring everything is evenly filled and bold.
Once you’ve filled in the triangles and nose, you can add a bit of smokiness or shading around the edges for depth if you like!
8. Billy the Puppet
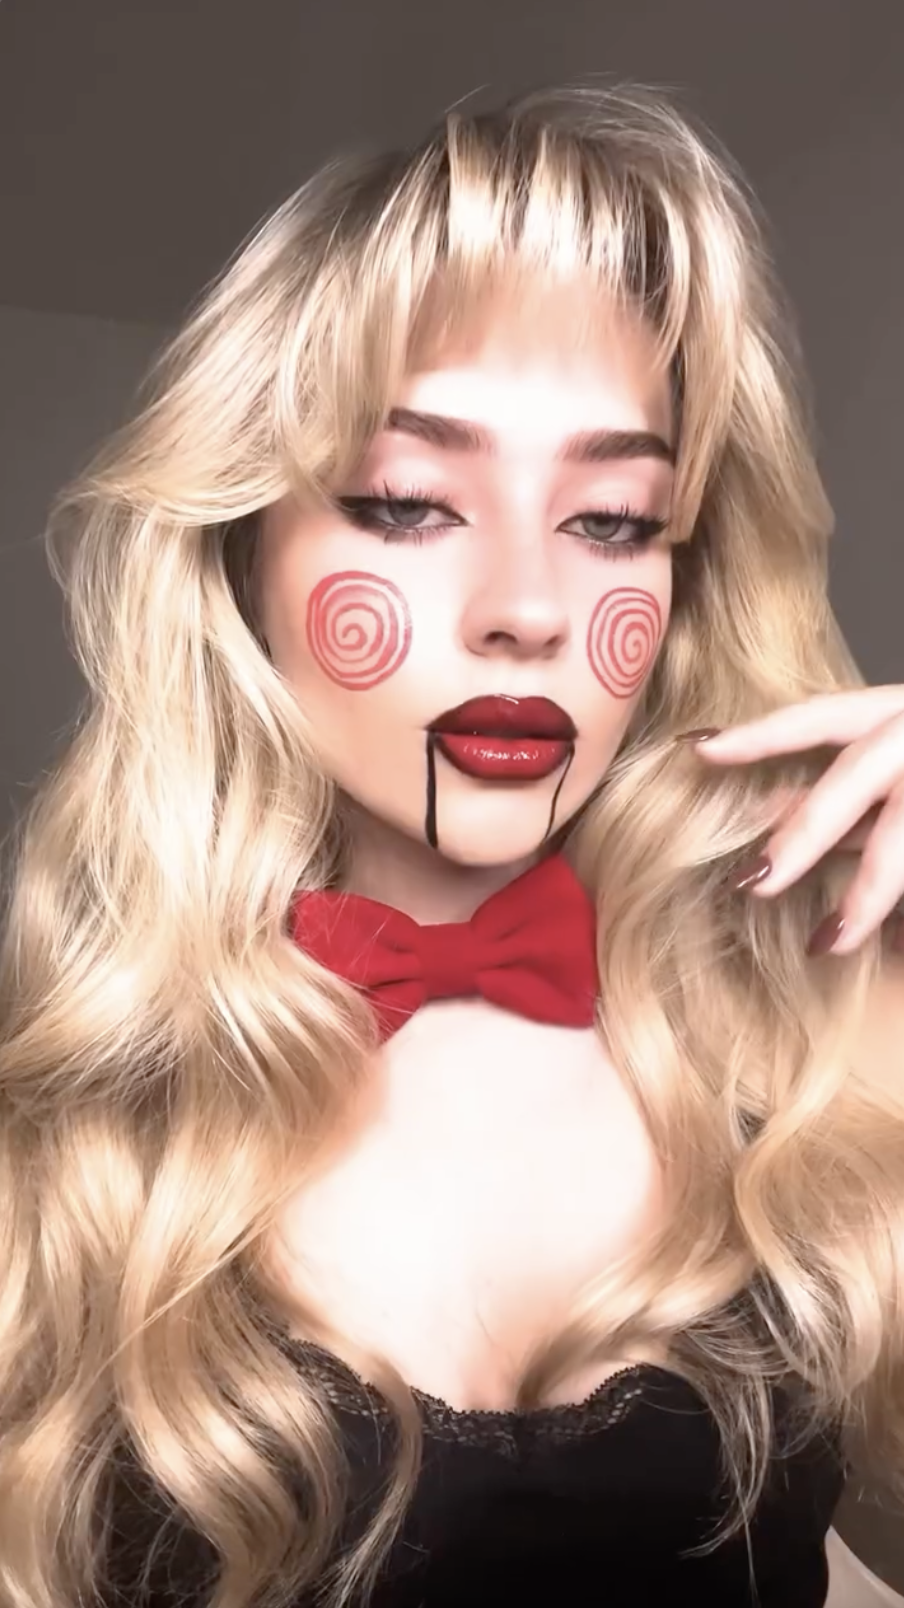
Steps for this Halloween makeup look:

Using a small circular object (like a cap), place it on your cheek as a stencil. Trace around the cap using a red lip liner or face paint, creating a perfect circle on both cheeks. Then, take a smaller brush and, starting from the center of the circle, draw spirals radiating inward to mimic Billy the Puppet’s signature look.
Use black eyeliner or a precise lip liner to outline your lips, exaggerating the shape into a more puppet-like style. Extend the corners of your mouth downward with two vertical lines, giving the illusion of a hinged jaw. Fill in the lips with a deep red lipstick for that classic horror-movie look.
Apply winged eyeliner for a sharp, dramatic look, and add false lashes for extra intensity. Complete the look with loose waves and a red bow tie to match Billy’s iconic outfit.
9. The Devil’s Kiss
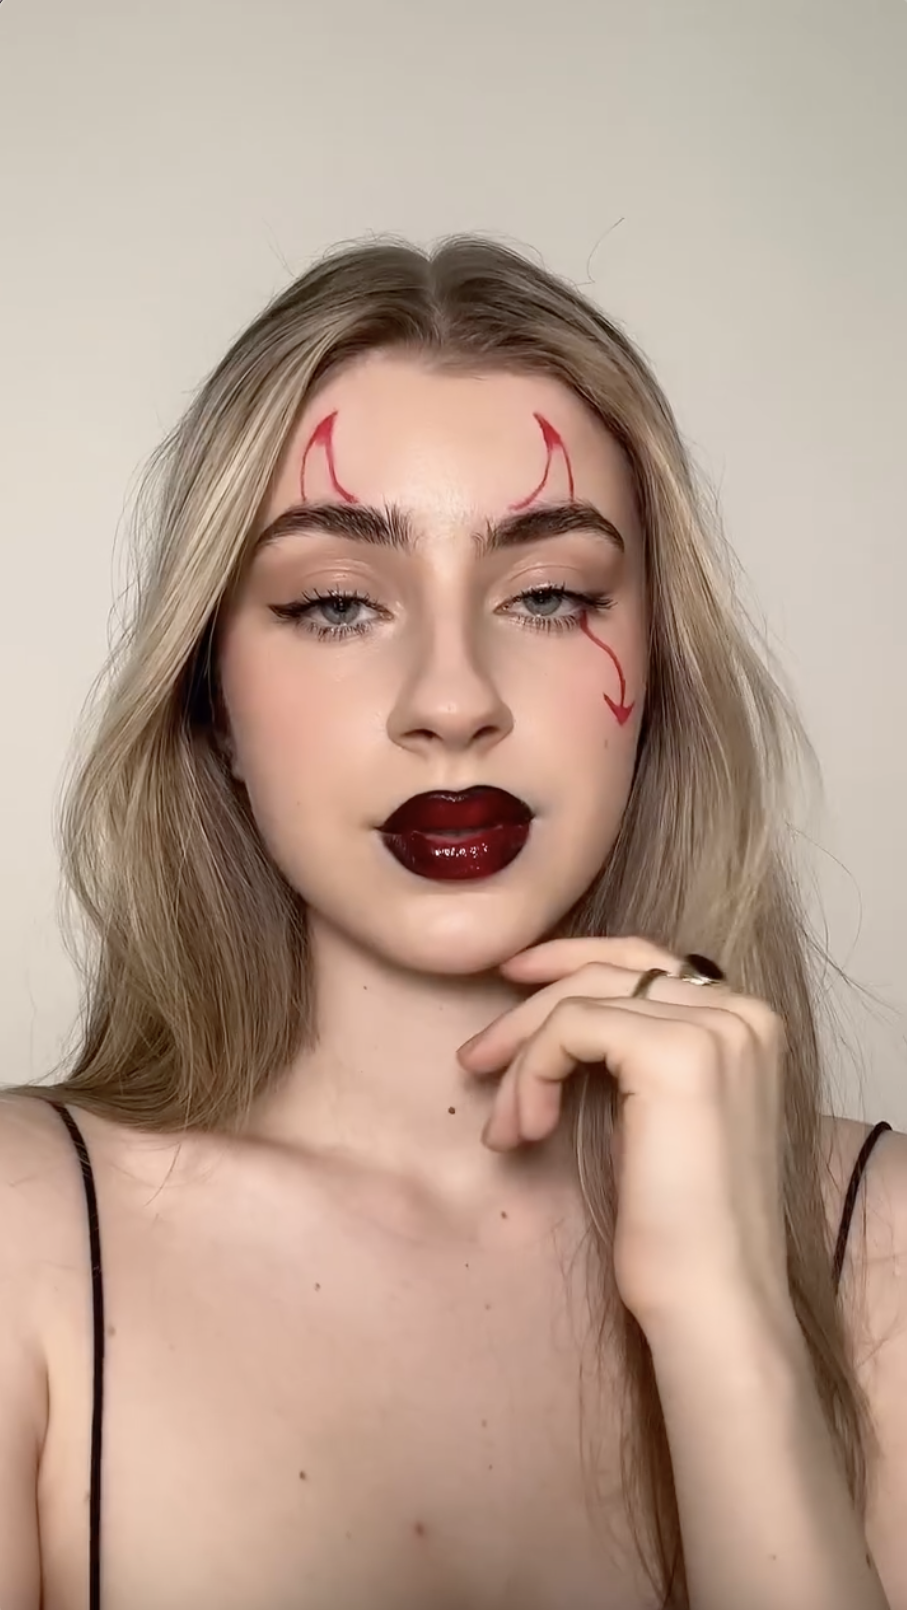
Steps for this Halloween makeup look:

This simple horned demon style is perfect last-minute Halloween makeup idea. All you need is an eyelash curler, some red lipstick, black liner, and a little gloss.
Start by taking an eyelash curler and coating the curved edge with red lipstick. Gently press the curler against your forehead, just above your brows, to stamp the outline of devilish horns on both sides.
Next, use the same eyelash curler to stamp a curved red line under one of your eyes. With an angled brush, extend the curved line into a sharp arrow pointing downward for a dramatic, sinister effect.
For the lips, outline them with black eyeliner, creating a strong, defined shape. Lightly fill in the corners of your lips with the same black liner to add depth and dimension. Now, apply red lipstick over your lips, blending it with the black for a gradient look. Finish off by applying a layer of clear gloss to make your lips shine.
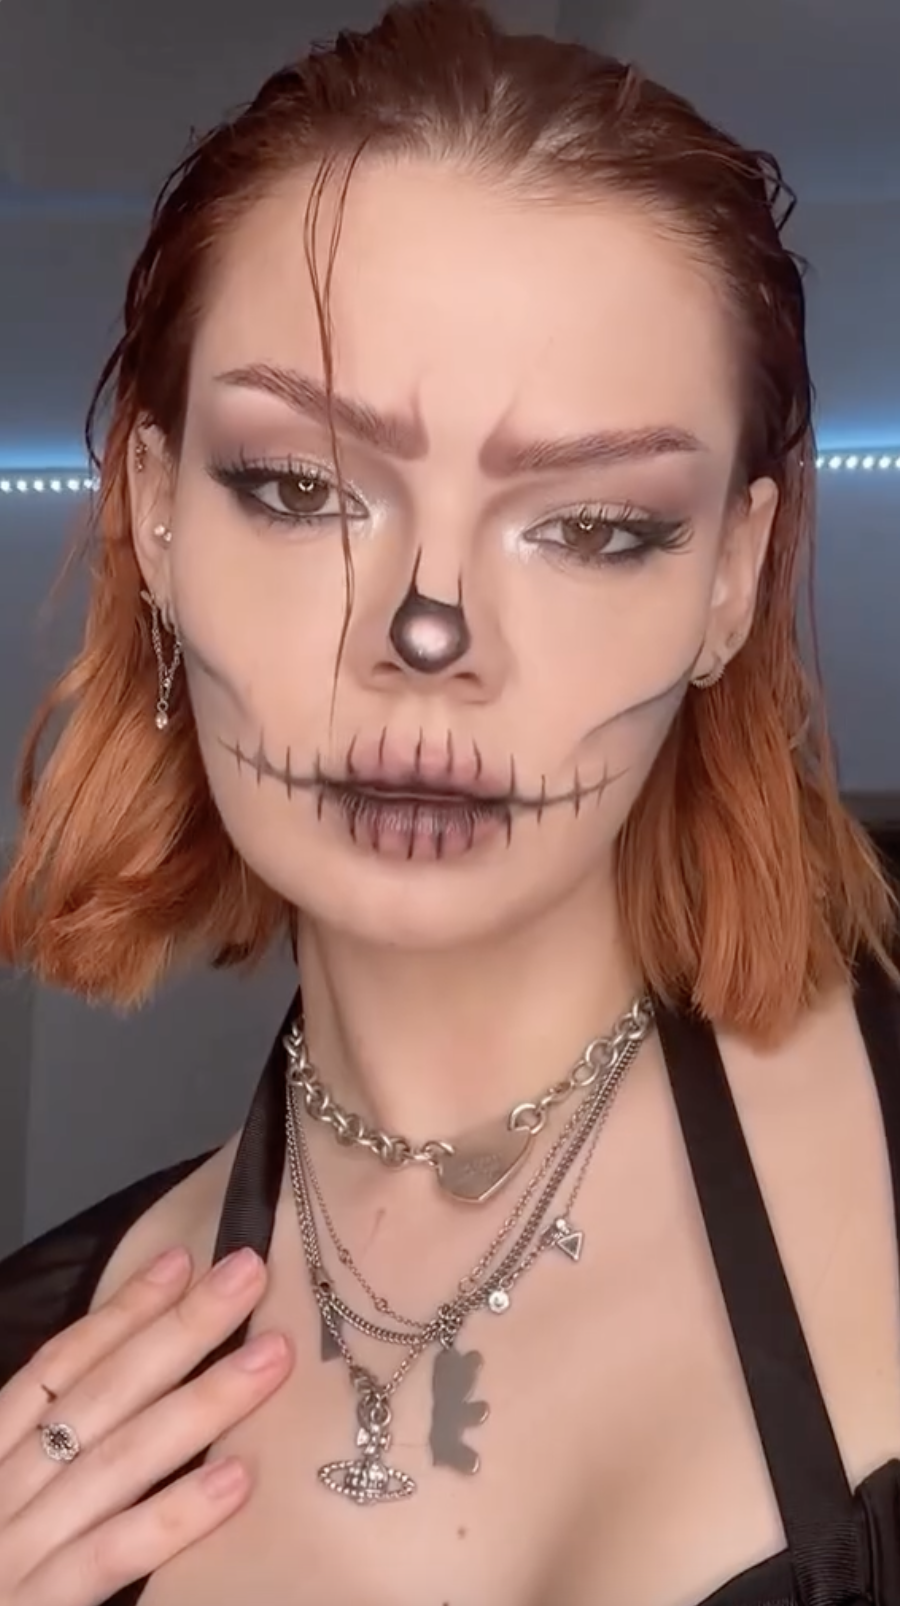
10. Easy Stitched Mouth With Toothpick
Steps for this Halloween makeup look:

This look is perfect for a simple yet cool stitched mouth and skull-like nose Halloween makeup idea. First, take an eyeliner and a toothpick. Apply the eyeliner directly onto the toothpick’s tip and begin creating a stitched pattern across your lips. After covering your lips, extend the corners of your mouth outward using the toothpick with more eyeliner and continue the stitch design along the new extended lines.
Next, use the same toothpick to create contour lines on both sides of your nose, giving your face a more defined structure. For the nose detail, grab a small cap that fits the tip of your nose and line the inner edge of the cap with eyeliner. Stamp the cap over your nose, creating a ring. Once you have the outline, take a precise brush, apply black liner or eyeshadow, and blend the ring inward to create a shadowy, dimensional effect. Lastly, connect the lines on the sides of your nose to the circle with the same brush for a cohesive look.
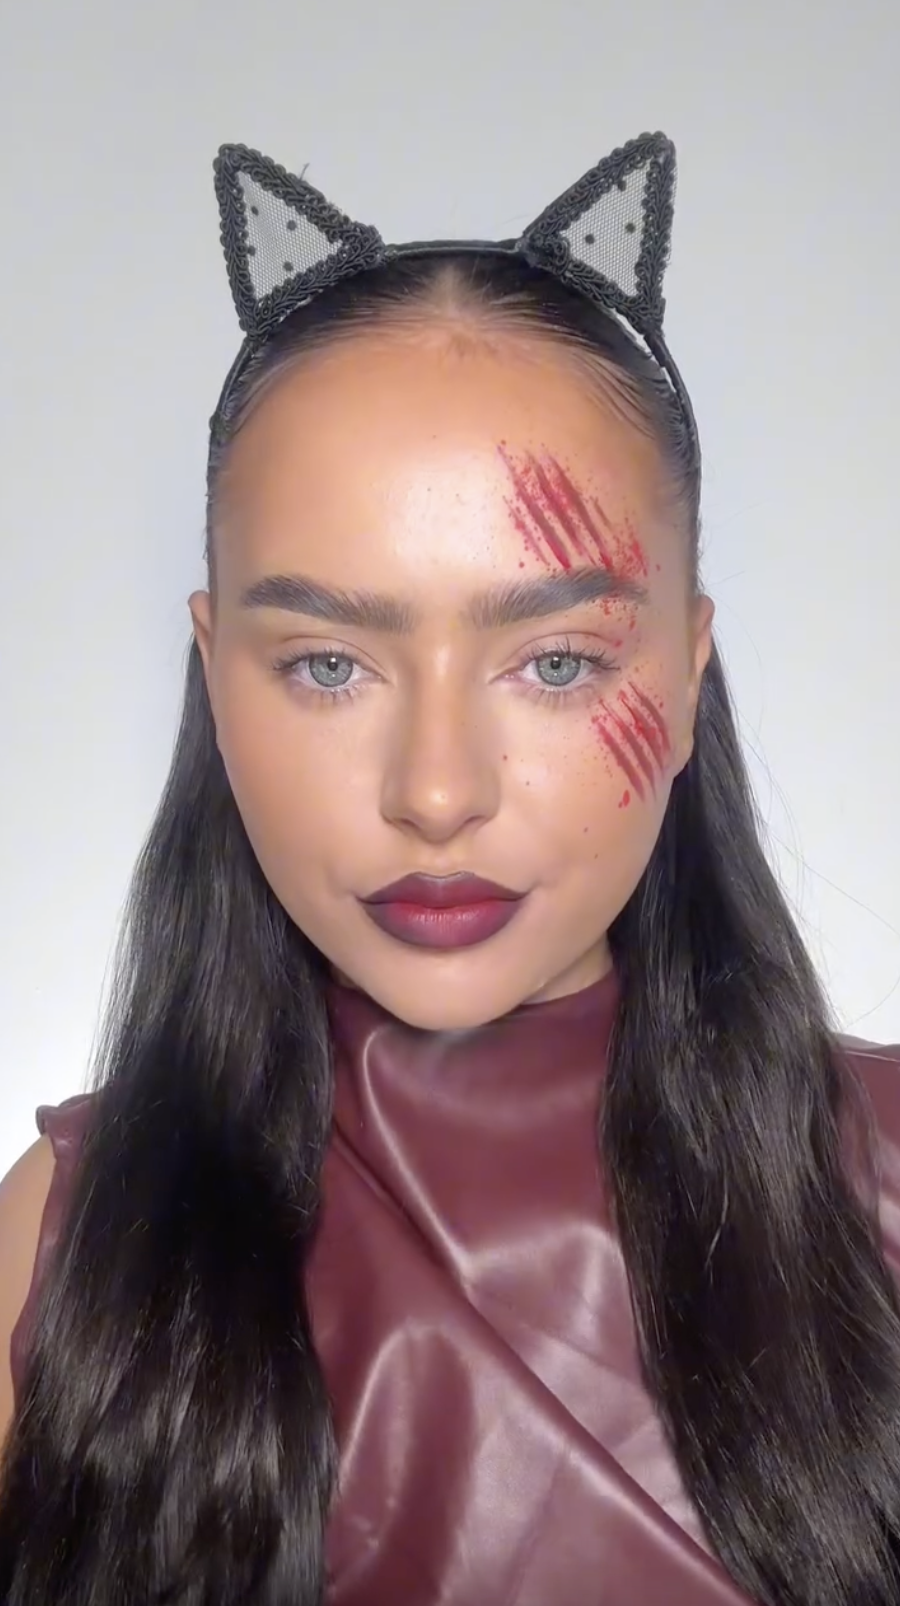
11. Create an Easy Bloody Scratch With a Fork
Steps for this Halloween makeup look:

For this fun and easy Halloween look, you’ll need a liquid lipstick and a fork—yes, just a fork!
Start by applying the red liquid lipstick to the back of the fork’s prongs. Then, carefully press the lipstick-coated fork onto your forehead, creating the illusion of a bloody scratch. Next, repeat the process below your eye, ensuring the two scratches line up, so it looks like one long scratch going across your face.
For extra realism, dip a toothbrush into some fake blood and flick it across the scratches, creating a splattered effect. Be sure to keep your eyes closed while doing this to avoid any mess.
Finish off the look with bold red lips and a pair of cute bunny ear headbands to contrast the fierce scratches.
Elevating the Shopping Game
Our platform offers in-depth reviews and analyses across various product categories, empowering you to shop with confidence and precision. Here, transparency and detailed research pave the way for smart choices that reflect your needs and values. Join our community and elevate your shopping experience from buyer to expert, one report at a time.