
7 Curling Iron Sizes and When to Use Each
Curling irons are versatile tools that transform straight hair into stunning curly styles. Whether you’re aiming for loose waves or tight ringlets, the size of your curling iron plays a pivotal role in achieving the desired outcome. But with so many options available, how do you choose the right size? This guide will walk you through seven curling iron sizes and when to use each, helping you to navigate your way to the perfect curls.
Different Curling Iron Sizes
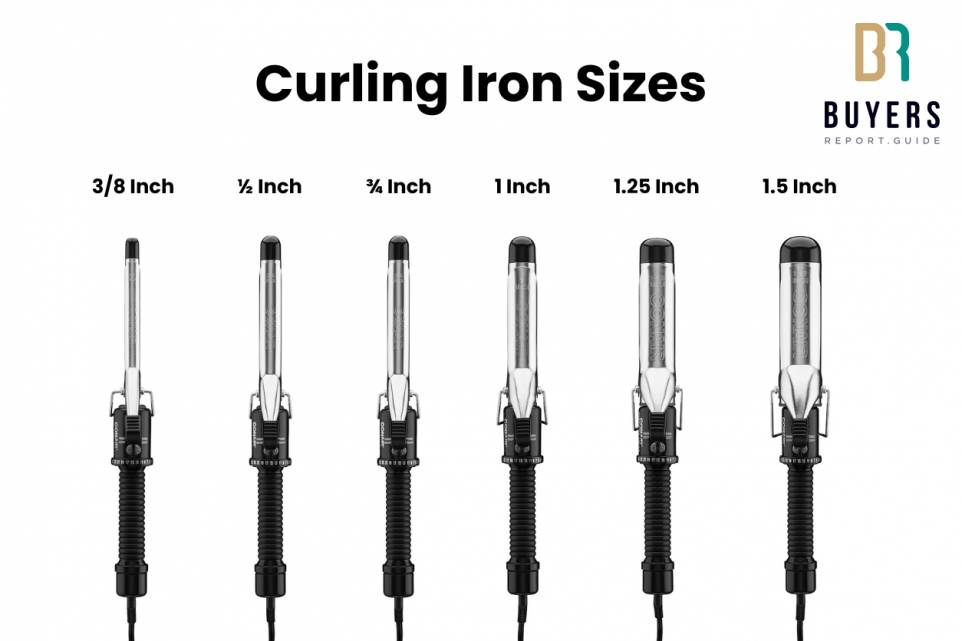
The 3/8 Inch Curling Iron
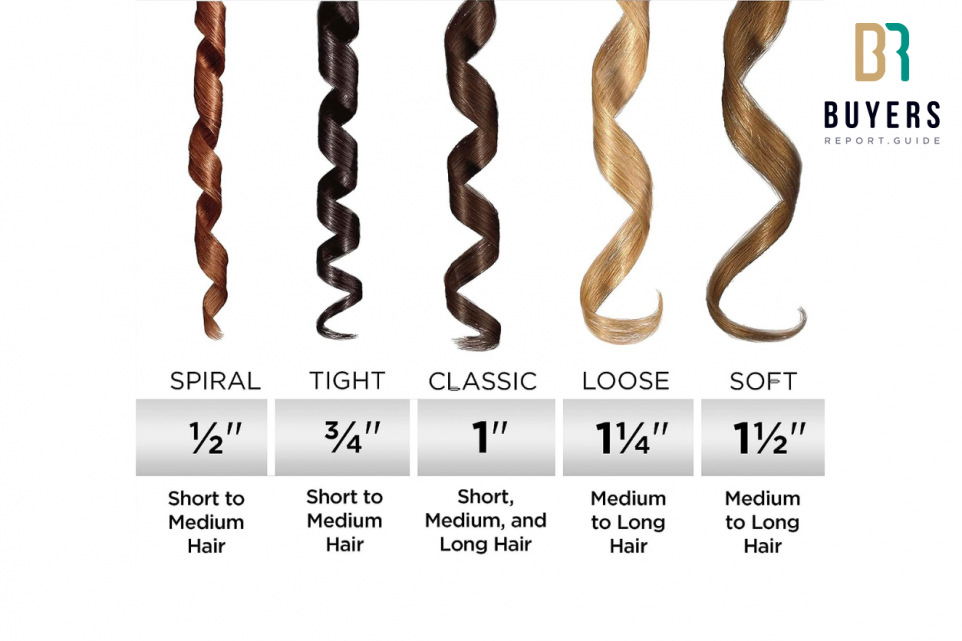
This is one of the smallest curling iron sizes available and is perfect for creating tight, defined spiral curls. It’s particularly great for those with shorter hair or individuals looking to replicate the classic ’80s tight curl look. Due to the curl’s size, the style tends to hold longer, which is ideal for those with naturally straight hair who struggle to maintain a curl.
The ½ Inch Curling Iron
A ½ inch curling iron is ideal for creating classic ringlets. It’s an excellent choice for those with medium-length hair and can achieve hairstyles reminiscent of the vintage Hollywood glam era. This is the size for you if you’re after bouncy and vibrant curls.
The ¾ Inch Curling Iron
This is a versatile curling iron suitable for various hair lengths. The ¾-inch iron creates curls that are tight but have a natural bounce to them. It’s perfect for adding volume and body to your hair, especially if you have thin hair that requires extra lift.
The 1 Inch Curling Iron
Arguably the most popular size, the 1-inch curling iron is the jack-of-all-trades in the curling world. It can produce soft, loose curls that appear natural and effortless. Perfect for daily wear, this size is ideal for those who want a casual yet polished look. It’s versatile enough for both short and long hair.
The 1.25 Inch Curling Iron
If you dream of sun, sand, and beach waves, the 1.25-inch curling iron is your go-to. It’s a great option for creating those loose, tousled beach waves that seem perfectly undone. It’s especially flattering on medium to long hair and gives a relaxed, vacation-ready vibe to any look.
The 1.5 Inch Curling Iron
For those looking for big, voluminous, loose curls, the 1.5-inch iron is the answer. It provides a gentle curve and volume to the hair rather than a defined curl, making it great for longer hair lengths. It’s perfect for creating a soft, romantic look, whether heading to a fancy event or a casual day out.
The 2 Inch Curling Iron
The largest of the standard curling iron sizes, a 2-inch barrel doesn’t so much curl as it does style. It’s excellent for adding volume at the roots and creating a soft bend in the ends of your hair, giving the illusion of a blowout. If you have extremely long hair and want a hint of shape and movement without pronounced curls, this is the iron to use.
How To Use a Curling Iron
Prep Your Hair
First things first, you’ve got to prep your hair. This is crucial because the right start can make a big difference. Make sure your hair is completely dry unless you’re using a wet-to-dry curling iron, but honestly, those can be quite harsh on your strands. A little heat protectant goes a long way to shield your hair from damage. Just lightly spray it over your hair or work it through with your fingers. This step helps to minimize any heat damage and keeps your hair looking healthy.
Choose a Curling Technique
Option 1: Classic Curls
For those of you who love a good classic curl, start by holding your curling iron vertically with the clasp facing forward. This might feel a bit awkward at first, but you’ll get the hang of it! Grab a 2-inch section of hair about 1-2 inches from the ends and clamp down. Now, here’s the fun part: curl the hair out and away from your face, rolling the iron up to your roots. Hold this for about 7-12 seconds—adjust the time based on whether your hair is fine, normal, or thick. Thinner hair needs less time, thicker hair might need a few extra seconds.
Option 2: For Thick Hair
If your hair laughs in the face of standard curling irons and demands a bit more oomph, this method’s for you. Hold your iron vertically, clasp facing forward, and grab that same 2-inch section of hair. This time, start about halfway up your hair shaft. Twist the iron out and away from your face, curling only near the roots first. Hold for about 7 seconds, then gently release the clasp slightly, sliding the iron down to the ends. Curl up to the roots again and hold for another 7 seconds. This method gives your roots some extra lift and creates a balanced curl from top to bottom.
Mixing It Up
Once you’ve nailed the front sections, it’s time to mix things up a bit to avoid that too-perfect prom look (unless that’s what you’re going for, of course!). For the next sections, you can invert the curling iron so the clasp faces the opposite direction. Grab your hair near the ends, twist the iron in and towards your head, rolling it all the way up to the roots. This switcheroo adds a bit of dimension and natural-looking chaos to your curls.
Final Touches
Now, don’t forget to set each curled section with a quick spritz of hairspray. This step helps lock in your hard work. When you’re all done curling, give your hair a gentle flip forward and then back, shaking out the curls with your fingers. This breaks up the curls slightly, giving you that gorgeous, effortless vibe.
Curling the Top Layers
When you reach the top layer, especially around your face, go back to option 1 for a softer bend. Curl these front pieces out and away from your face but reduce the heat time to about 5-7 seconds for a looser wave that frames your face beautifully without overpowering it.
Final Styling
Give your entire head one last good spray with hairspray to set everything in place. Then, gently rake your fingers through your hair or use a wide-tooth comb if you prefer. This step blends the curls into more natural-looking waves and adds volume.
Elevating the Shopping Game
Our platform offers in-depth reviews and analyses across various product categories, empowering you to shop with confidence and precision. Here, transparency and detailed research pave the way for smart choices that reflect your needs and values. Join our community and elevate your shopping experience from buyer to expert, one report at a time.